Note
If you are not interested in technical details of Decouple, you can check videos at the end of each Decouple Powered System.
Significant progress has been made since the last blog post.
However, this post will primarily concentrate on Decouple and how it enhances the User Interface in Poltergeist.
But before we dive in how Poltergeist uses Decouple, let’s delve into the technical intricacies of Decouple.
::note
Decouple
Decouple is a robust and versatile MVVM(Model-View-ViewModel) framework designed specifically for use with Unreal Engine’s UMG, offering seamless compatibility with both C++ and Blueprints.
Operating on the principles of the MVVM architectural pattern, Decouple empowers developers to create highly maintainable and modular user interfaces within their Unreal projects.
By adhering to MVVM principles, Decouple separates the presentation logic ( ViewModel ) from the user interface ( View ) and the underlying data ( Model ), resulting in cleaner and more efficient code.
This approach enhances the scalability, testability, and overall maintainability of UMG-based projects, making Decouple a valuable asset for Unreal Engine developers seeking to elevate the quality and efficiency of their user interfaces.
View
Derived from UUserWidget.
View encompasses the UMG design and essential logic required to manage the visual aspects of the view.
Made with the UMG Designer.
Decouple predefined View Classes:
- UUDecouple_ViewBase
- Base class for all
Decouple Views.
- Base class for all
- UUDecouple_ViewRoot
- Native User Widget used as the root of all other UMG widgets.
Contains only one widget, a canvas.
- Native User Widget used as the root of all other UMG widgets.
- UUDecouple_ViewPopup
- Base class for all
Popup Views
- Base class for all
- UUDecouple_ViewButton
- Base class for all
Button Views
- Base class for all
ViewModel
Class derived from UObject.
ViewModel holds all the logic needed to facilitate data interaction between the View and the Model.
Decouple predefined ViewModels:
- UUDecouple_ViewModelBase
- Base class for all
Decouple ViewModels.
- Base class for all
- UUDecouple_ViewModelRoot
ViewModelfor theRoot View
- UUDecouple_ViewModelPopup
ViewModelfor thePopup View
Model
Class derived from UObject.
This class exclusively holds properties essential for Views.
Models are automatically generated using the Decouple Editor .
Decouple predefined ViewModels:
- UUDecouple_ModelBase
- Base class for all
Decouple Models.
- Base class for all
- UUDecouple_ModelRoot
Modelfor theRoot ViewModel
- UUDecouple_ModelPopup
Modelfor thePopup ViewModel
Features
Decouple is powerful MVVM framework with many nice features.
-
Decouple Editor
Centralized Custom Editor for all Decouple data.
-
Data Binding
Event based data binding..
-
Code generation
C++ code generation.
-
Data Objects & Tags
Decouple Data Objects & Decouple GameplayTags
Decouple Editor
Decouple boasts its own custom editor.
While the Decouple Editor is still a work in progress, its current form includes all the essential tools needed to work with Decouple.
Decouple Editor serves as a central hub where you can inspect all the project’s Decouple Data, including classes, tags, generated data, and check for any Decouple errors.
Editor facilitates the serialization of all project Decouple Data into a JSON file.
Using this JSON file, it becomes effortless to track and display any modified, updated, added, or removed data in the Summary window.
The editor can display all Views, ViewModels, and Models in an intuitive list, illustrating their relationships and highlighting any existing errors that need attention. It also provides a convenient way to swiftly access and open an associated MVVM class.
If everything appears satisfactory, new tags and models can be generated as C++ code.
Once this process is completed, the Decouple Editor will notify that an editor restart is necessary to compile the new code.
Here is what the editor interface looks like.
Decouple Editor.
Data Binding
Views have the capability to bind events, which can be triggered when Model properties change or when specific context events occur, optionally with a specified target.
Both bindings can either be Global or exclusively triggered by the ViewModel’s Model associated with the View.
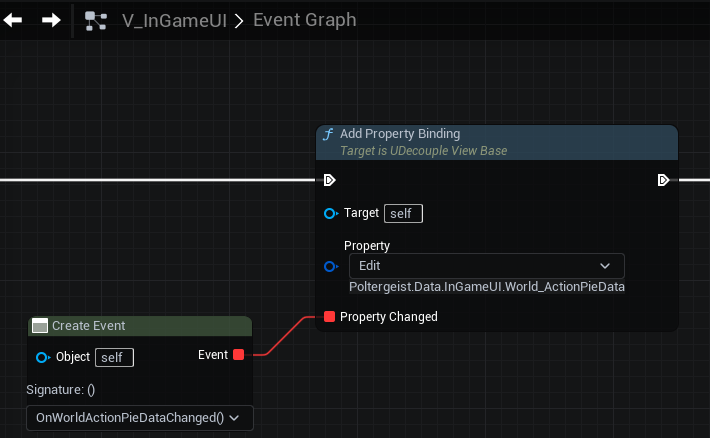
Property Binding
In this example of the InGame View, we bind events to respond whenever Model properties such as Gadgets, Pockets, or World_ActionPieData are modified.
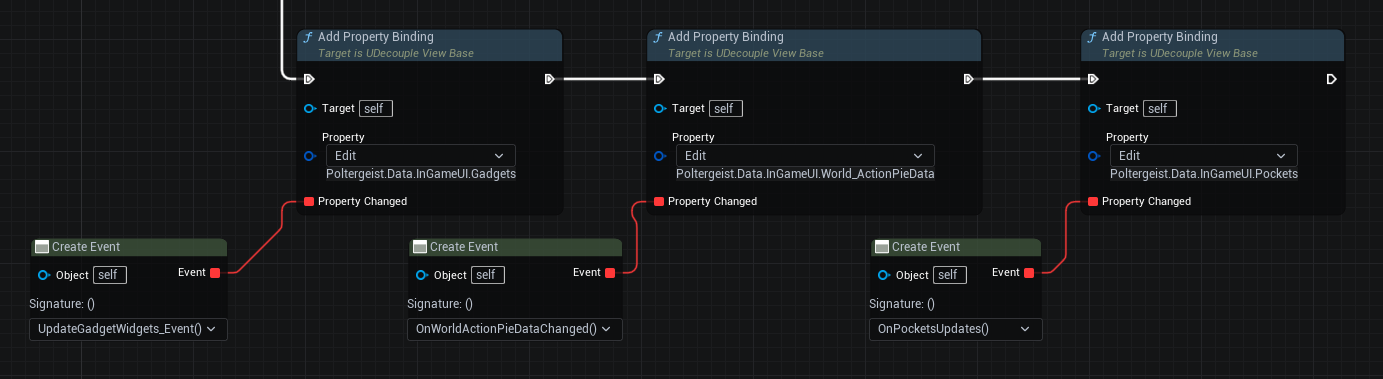
Example of Property Binding
Triggering Property Binding
Property Bindings should occur automatically if the model has been generated using the Decouple Editor.
Additionally, it’s possible to manually trigger any property binding by utilizing the PropertyChanged() function within the ViewModel.
Context Binding
In this example, the MainMenu View establishes two Context Bindings: one for monitoring changes in the active Main Menu button and another for when the Splash View is handled.
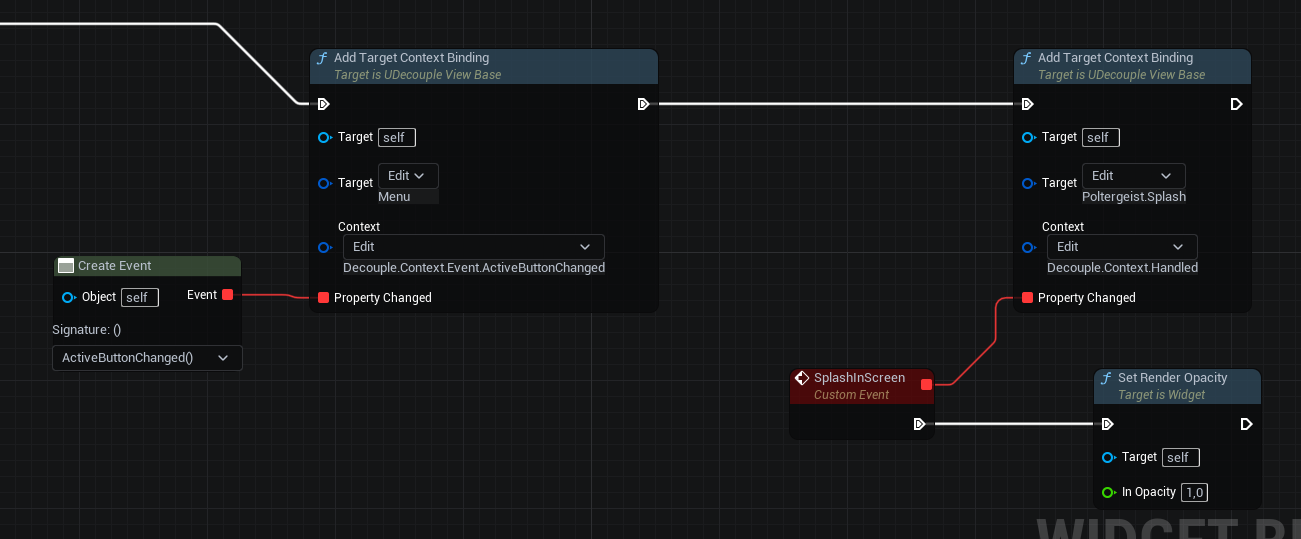
Example of Context Binding
Triggering Context Binding
Context Bindings must be manually triggered whenever necessary by utilizing the PropertyContextChanged() function within the ViewModel.
Example when Splash View has finished and is fading out.
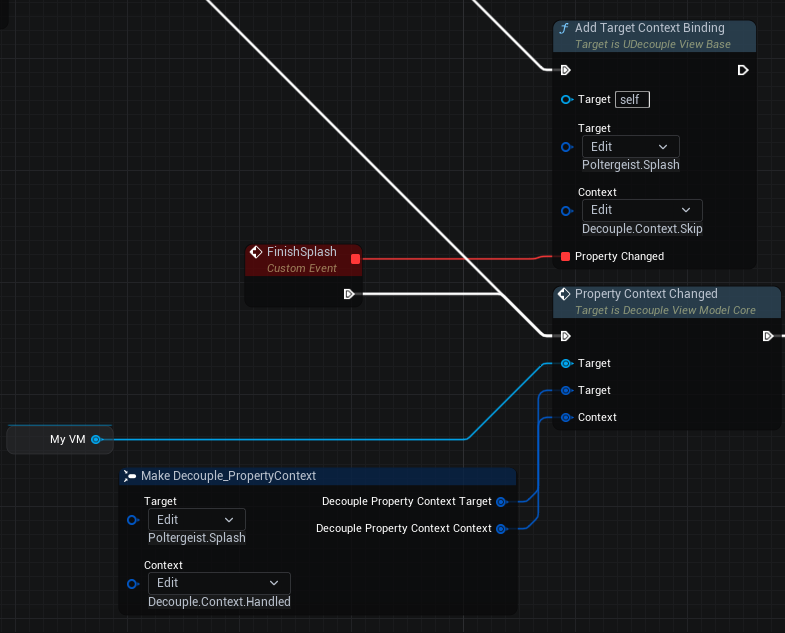
Example from Splash View
Code Generation
Decouple generates C++ Models from Blueprint Models.
Automatically generated C++ models will broadcast any property changes to bound views through the use of the Data Binding mechanism.
Any property categorized under Generate will be collected for the model generation process.
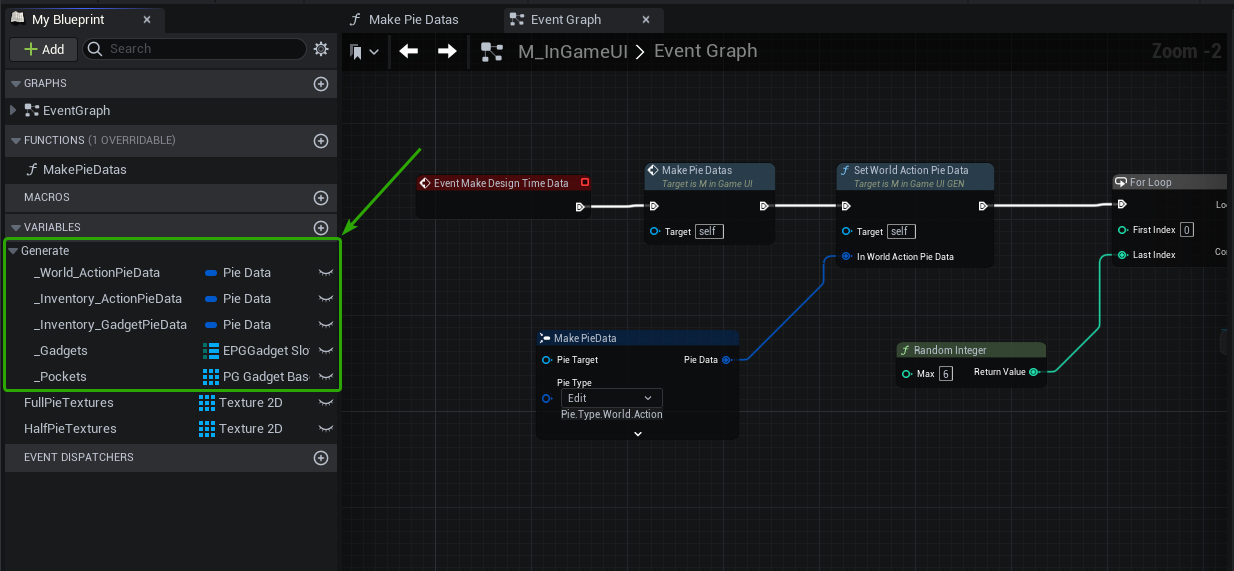
Here is the Model Code Generation preview in the Summary window for the above Blueprint.
Generated Model.
Here is the complete header of the UM_InGameUI_GEN class.
UM_InGameUI_GEN
// Auto generated.
// Do not tamper!

#pragma once

#include "CoreMinimal.h"
#include "Models/Decouple_ModelBase.h"
#include "Poltergeist/Generated/Tags/PoltergeistDataTags.h"
#include "Poltergeist/core/Shared/Common.h"

#include "M_InGameUI_GEN.generated.h"

struct FPieData;
enum class EPGGadgetSlot:  uint8;
class APG_GadgetBase;


UCLASS(Blueprintable, Abstract)
class POLTERGEIST_API UM_InGameUI_GEN : public UDecouple_ModelBase
{
public:
	GENERATED_BODY()

	UM_InGameUI_GEN(const FObjectInitializer& ObjectInitializer){ bGenerated = true;}

/* --- --------------------------------------------- --- */
/* --- Poltergeist.Data.InGameUI.World_ActionPieData --- */
/* --- --------------------------------------------- --- */

/* Property for World_ActionPieData */
UPROPERTY(BlueprintReadOnly, Category = Data)
FPieData World_ActionPieData;


 /* Setter for World_ActionPieData */
UFUNCTION(BlueprintCallable)
FORCEINLINE void SetWorld_ActionPieData(FPieData InWorld_ActionPieData)
{
	World_ActionPieData = InWorld_ActionPieData;
	PropertyChanged(FPoltergeistDataTags::Get().Data_InGameUI_World_ActionPieData);
}


 /* Getter for World_ActionPieData */
UFUNCTION(BlueprintCallable, BlueprintPure)
FORCEINLINE FPieData& GetWorld_ActionPieData()  {return World_ActionPieData;}

/* --- End Of World_ActionPieData --- */


/* --- ------------------------------------------------- --- */
/* --- Poltergeist.Data.InGameUI.Inventory_ActionPieData --- */
/* --- ------------------------------------------------- --- */

/* Property for Inventory_ActionPieData */
UPROPERTY(BlueprintReadOnly, Category = Data)
FPieData Inventory_ActionPieData;


 /* Setter for Inventory_ActionPieData */
UFUNCTION(BlueprintCallable)
FORCEINLINE void SetInventory_ActionPieData(FPieData InInventory_ActionPieData)
{
	Inventory_ActionPieData = InInventory_ActionPieData;
	PropertyChanged(FPoltergeistDataTags::Get().Data_InGameUI_Inventory_ActionPieData);
}


 /* Getter for Inventory_ActionPieData */
UFUNCTION(BlueprintCallable, BlueprintPure)
FORCEINLINE FPieData& GetInventory_ActionPieData() {return Inventory_ActionPieData;}

/* --- End Of Inventory_ActionPieData --- */


/* --- ------------------------------------------------- --- */
/* --- Poltergeist.Data.InGameUI.Inventory_GadgetPieData --- */
/* --- ------------------------------------------------- --- */

/* Property for Inventory_GadgetPieData */
UPROPERTY(BlueprintReadOnly, Category = Data)
FPieData Inventory_GadgetPieData;


 /* Setter for Inventory_GadgetPieData */
UFUNCTION(BlueprintCallable)
FORCEINLINE void SetInventory_GadgetPieData(FPieData InInventory_GadgetPieData)
{
	Inventory_GadgetPieData = InInventory_GadgetPieData;
	PropertyChanged(FPoltergeistDataTags::Get().Data_InGameUI_Inventory_GadgetPieData);
}


 /* Getter for Inventory_GadgetPieData */
UFUNCTION(BlueprintCallable, BlueprintPure)
FORCEINLINE FPieData& GetInventory_GadgetPieData()  {return Inventory_GadgetPieData;}

/* --- End Of Inventory_GadgetPieData --- */


/* --- --------------------------------- --- */
/* --- Poltergeist.Data.InGameUI.Gadgets --- */
/* --- --------------------------------- --- */

/* Property for Gadgets */
UPROPERTY(BlueprintReadOnly, Category = Data)
TMap<EPGGadgetSlot,APG_GadgetBase*> Gadgets;


 /* Setter for Gadgets */
UFUNCTION(BlueprintCallable)
FORCEINLINE void SetGadgets(TMap<EPGGadgetSlot,APG_GadgetBase*> InGadgets)
{
	Gadgets = InGadgets;
	PropertyChanged(FPoltergeistDataTags::Get().Data_InGameUI_Gadgets);
}


 /* Getter for Gadgets */
UFUNCTION(BlueprintCallable, BlueprintPure)
FORCEINLINE TMap<EPGGadgetSlot,APG_GadgetBase*>& GetGadgets()  {return Gadgets;}

/* --- End Of Gadgets --- */


/* --- --------------------------------- --- */
/* --- Poltergeist.Data.InGameUI.Pockets --- */
/* --- --------------------------------- --- */

/* Property for Pockets */
UPROPERTY(BlueprintReadOnly, Category = Data)
TArray<APG_GadgetBase*> Pockets;


 /* Setter for Pockets */
UFUNCTION(BlueprintCallable)
FORCEINLINE void SetPockets(const TArray<APG_GadgetBase*>& InPockets)
{
	Pockets = InPockets;
	PropertyChanged(FPoltergeistDataTags::Get().Data_InGameUI_Pockets);
}


 /* Getter for Pockets */
UFUNCTION(BlueprintCallable, BlueprintPure)
FORCEINLINE TArray<APG_GadgetBase*>& GetPockets()  {return Pockets;}

/* --- End Of Pockets --- */

};
This entire class is automatically generated by Decouple.
Data Objects & Tags
Decouple heavily relies on GameplayTags to identify nearly everything within the system.
Every data-bindable property within the Model, every distinct view, and each Model is linked to an associated GameplayTag.
Decouple includes pre-defined GameplayTags for various context actions, such as indicating whether the context action was successfully handled,
if the context result is ready or valid, and whether the result is positive, negative, or neutral for the context target, among others.
Decouple has its own way of sending and receiving custom payload data when ever needed.
-
FDecoupleData
- Struct primarily designed to serve as optional or additional payload data.
-
UDecoupleDataObjectBase
- A class encapsulated within the
FDecoupleDatastructure, which can be subclassed to fulfill custom payload requirements.
- A class encapsulated within the
FDecoupleData is a straightforward struct primarily designed to serve as optional or additional payload data.
FDecoupleData
USTRUCT(BlueprintType)
struct DECOUPLE_API FDecoupleData
{
	GENERATED_BODY()
	FDecoupleData(): DataObject(nullptr)
	{
	}

	FGameplayTag GetDataType() { return DataObject != NULL ? DataObject->GetDataType() : FGameplayTag::EmptyTag; }

	bool IsValid() const
	{
		if (DataObject == NULL) return false;
		return DataObject->IsValidData();
	}

	UPROPERTY(BlueprintReadWrite, Category = "Data")
	UDecoupleDataObjectBase* DataObject;
};
UDecoupleDataObjectBase is an abstract class that must be inherited by any child class for notification requirements.
UDecoupleDataObjectBase
-
#Header class DECOUPLE_API UDecoupleDataObjectBase : public UObject { GENERATED_BODY() public: UDecoupleDataObjectBase(const FObjectInitializer& ObjectInitializer); virtual void PostInitProperties() override; UFUNCTION() virtual void BeginPlay(UWorld* World); UFUNCTION(BlueprintPure) virtual void Clear() { }; UFUNCTION(BlueprintPure) virtual FGameplayTag GetDataType(); virtual UWorld* GetWorld() const override; UPROPERTY() UWorld* CachedWorld; }; -
UDecoupleDataObjectBase::UDecoupleDataObjectBase(const FObjectInitializer& ObjectInitializer)
{
}

void UDecoupleDataObjectBase::PostInitProperties()
{
	Super::PostInitProperties();
	FWorldDelegates::OnPostWorldCreation.AddUObject(this, &UDecoupleDataObjectBase::BeginPlay);
}

void UDecoupleDataObjectBase::BeginPlay(UWorld* World)
{
	if (GIsEditor && !GIsPlayInEditorWorld) return;
	CachedWorld = World;
}

bool UDecoupleDataObjectBase::IsValidData()
{
	return false;
}

FGameplayTag UDecoupleDataObjectBase::GetDataType()
{
	return FGameplayTag::EmptyTag;
}

UWorld* UDecoupleDataObjectBase::GetWorld() const
{
	// Return pointer to World from object owner, if we don’t work in editor
	if (GIsEditor && !GIsPlayInEditorWorld)
	{
		return nullptr;
	}
	if (GetOuter())
	{
		if (GetOuter()->GetWorld())
		{
			return GetOuter()->GetWorld();
		}
	}
	if (CachedWorld)
		return CachedWorld;

	return NULL;
}
Now that we’ve concluded the technical introduction, let’s explore the systems powered by Decouple that we’ve implemented for Poltergeist.
Systems
-
Notifications
Notification System powered by Decouple.
-
Tooltips
Tooltip System powered by Decouple.
-
Piemenus
Piemenu System powered by Decouple.
-
Popups
Work in Progress Main Menu & Popup System.
1. Notifications
First system is a Notification System, powered by Decouple.
This system isn’t just any run-of-the-mill feature; it’s the backbone of our in-game messaging, toasts, and notifications.
What makes this system truly remarkable is its versatility.
We’ve designed it to handle virtually any requirement you might envision for an in-game notification system.
At its core, it’s powered by Decouple, our custom MVVM solution, which seamlessly integrates with our game’s architecture to make these notifications come to life.
The system boasts an intuitive design, making it effortless to both utilize and customize to cater to diverse requirements.
Let’s take a look at an illustrative use case.
Decouple_Subsystem offers a set of convenient helper functions.
    bool UDecouple_Subsystem::ShowNotificationByViewModelClass(TSubclassOf<UDecouple_ViewModelCore> ViewModelClass, const FDecoupleData& NotificationData)

	bool UDecouple_Subsystem::ShowNotificationByViewModelTag(const FGameplayTag ViewModelTag, const FDecoupleData& NotificationData)
Decouple will attempt to locate the relevant ViewModel and then pass the NotificationData to the ViewModel.
UDecouple_ViewModelCore::ShowNotification(const FDecoupleData& NotificationData)
If any of the Views within the ViewModel can manage notifications, the ViewModel will seamlessly relay the FDecoupleData to the respective View.
UFUNCTION(BlueprintImplementableEvent)
void UUDecouple_ViewBase::HandleNotification(const FDecoupleData& NotificationData)
The View widget is required to implement the HandleNotification method to facilitate the display or creation of notifications as required.
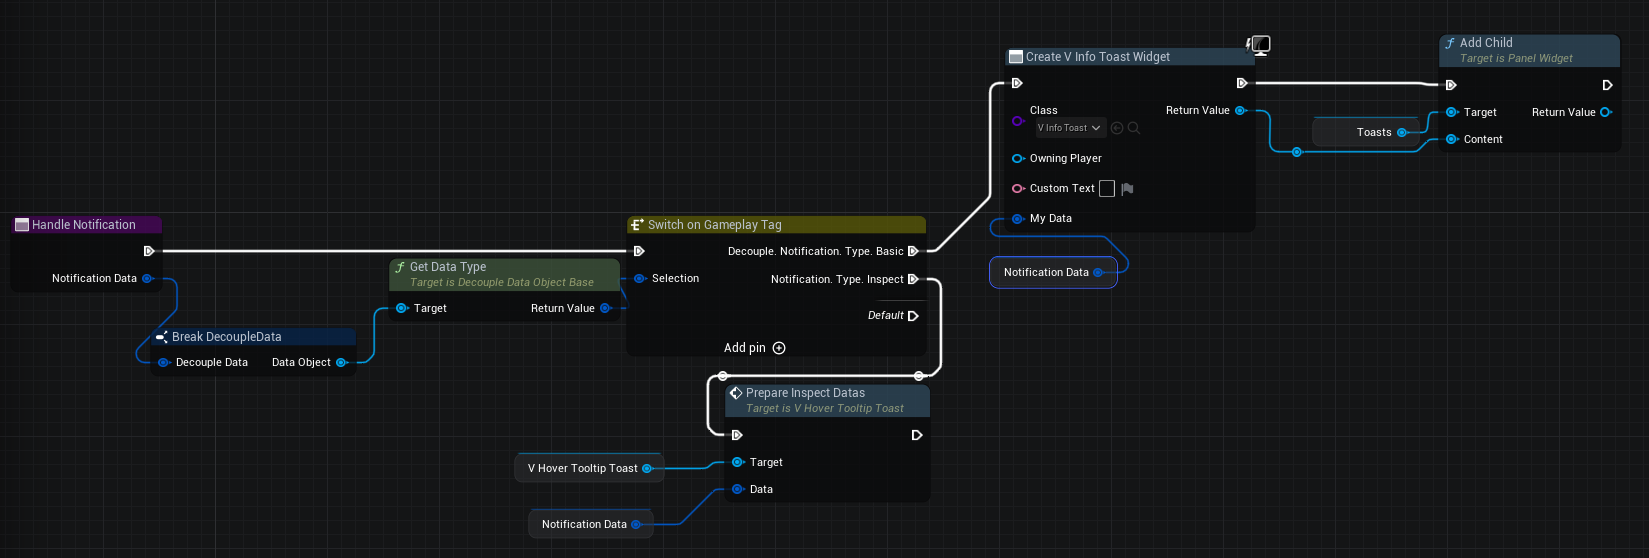
Here’s how our Ingame View implements the HandleNotification method.
For instance, let’s explore a straightforward example of a Toast notification.
UCLASS(BlueprintType)
class DECOUPLE_API UBasicNotificationDataObject : public UNotificationDataObjectBase
{
	GENERATED_BODY()

public:
	UPROPERTY(BlueprintReadWrite)
	FBasicNotificationData NotificationData;

	virtual bool IsValidData() override{return NotificationData.IsValid();}

	virtual FGameplayTag GetDataType() override{return FDecoupleGlobalTags::Get().Notification_Type_Basic;}
};
UNotificationDataObjectBase is simply a pure subclass of UDecoupleDataObjectBase
And here is the FBasicNotificationData:
USTRUCT(BlueprintType)
struct DECOUPLE_API FBasicNotificationData
{
	GENERATED_BODY()
	FBasicNotificationData()
	{
		NotificationContext = FGameplayTag::EmptyTag;
		NotificationTarget = FGameplayTag::EmptyTag;
		NotificationResult = FDecoupleGlobalTags::Get().Notification_Neutral;
	};

	FBasicNotificationData(const FGameplayTag InNotificationTag)
	{
		NotificationTarget = InNotificationTag;
	}

	FBasicNotificationData(const FGameplayTag InNotificationContext, const FGameplayTag InNotificationTag)
	{
		NotificationContext = InNotificationContext;
		NotificationTarget = InNotificationTag;
	}


	bool IsValid() const
	{
		if (NotificationContext.IsValid() || NotificationTarget.IsValid())
			return true;

		if (!OverrideNotificationText.IsEmpty())
			return true;

		return false;
	}

	UPROPERTY(BlueprintReadWrite, Category = "Notification Data")
	FGameplayTag NotificationContext;
	UPROPERTY(BlueprintReadWrite, Category = "Notification Data")
	FGameplayTag NotificationTarget;
	UPROPERTY(BlueprintReadWrite, Category = "Notification Data")
	FGameplayTag NotificationResult;
	UPROPERTY(BlueprintReadWrite, Category = "Notification Data")
	FText OverrideNotificationText;
};
FBasicNotificationData comprises just three variables to populate:
- NotificationContext: Describing the event.
- NotificationTarget: Identifying the recipient.
- NotificationResult: Signifying whether the notification conveys a positive or negative outcome for the recipient.
Here’s how to trigger a Toast notification when a player picks up a gadget.
		FDecoupleData NotificationData;
		UBasicNotificationDataObject* NotificationDataObject = NewObject<UBasicNotificationDataObject>(GetTransientPackage());
		NotificationData.DataObject = NotificationDataObject;
		NotificationData.NotificationType = NotificationDataObject->GetNotificationType();

		NotificationDataObject->NotificationData.NotificationContext = FPGTags::Get().InGame_World_Action_Pickup;
		NotificationDataObject->NotificationData.NotificationTarget = Gadget.GadgetTag;
		NotificationDataObject->NotificationData.NotificationResult = FDecoupleGlobalTags::Get().Notification_Positive;

		UDecouple_Subsystem* Decouple_Subsystem = GetWorld()->GetSubsystem<UDecouple_Subsystem>();
		Decouple_Subsystem->ShowNotificationByViewModelTag(FPoltergeistDataTags::Get().ViewModel_InGameUI, NotificationData);
Next, let’s examine how the Toast_Widget assembles the necessary information for the toast notification.
Let’s see how this translates in-game.
Toasts.
2. Tooltips
The Tooltip System in Poltergeist essentially builds upon the Notification System , utilizing a more intricate UNotificationDataObjectBase.
Within the WorldInteractionComponent::Tick function, we perform a check to identify the interactable objects that the player is currently observing.
	if (ClosestToScreenCenter_InteractableActor.IsValid())
	{
		if (LastFrameNotificationObject != InspectNotificationObject->Data.ObjectInspectData.WorldActor || !InspectNotificationObject->IsValidData())
		{
			if (IWorldInteractableObject::Execute_GetObjectInspectData(ClosestToScreenCenter_InteractableActor.Get(), GetOwner(), InspectNotificationData))
			{
				UDecouple_Subsystem* Decouple_Subsystem = GetWorld()->GetSubsystem<UDecouple_Subsystem>();
				Decouple_Subsystem->ShowNotificationByViewModelTag(FPoltergeistDataTags::Get().ViewModel_InGameUI, InspectNotificationData);
			}
			IWorldInteractableObject::Execute_SetHighlightState(ClosestToScreenCenter_InteractableActor.Get(),true);
		}
	}
    ...
The FObjectInspectNotificationData struct introduces a bit more complexity compared to a simple Toast notification, yet it adheres to the same fundamental principles.
USTRUCT(BlueprintType)
struct FObjectInspectData : public FTableRowBase
{
	GENERATED_BODY()

	UPROPERTY(BlueprintReadOnly)
	AActor* WorldActor;

	UPROPERTY(BlueprintReadWrite)
	FGameplayTag ObjectName;

	UPROPERTY(BlueprintReadWrite)
	FText ObjectNameOverride;

	UPROPERTY(BlueprintReadWrite)
	FText ObjectDescription;

	UPROPERTY(BlueprintReadWrite)
	FGameplayTag PrimaryAbility;

	UPROPERTY(BlueprintReadWrite)
	FGameplayTag SecondaryAbility;

	UPROPERTY(BlueprintReadWrite)
	TMap<FGameplayTag, float> ObjectStats;

	UPROPERTY(BlueprintReadWrite)
	TMap<FGameplayTag, FAbilityEffectChangeAttributeData> AbilityResourceMod;

	bool IsValid() const
	{
		return WorldActor != NULL;
	}
};
I won’t delve into the specifics of populating the FObjectInspectData here, as the code for that process is rather extensive.
Now, let’s take a look at how these elements manifest within the game itself.
Tooltips.
3. Piemenus
The Piemenu system is another functionality enhanced by Decouple's capabilities.
In Poltergeist, we feature two types of Piemenus known as:
- World Action Pie
- Inventory Pies (Action & Gadget)
World Action Pie
World Action Pie is the Piemenu that becomes accessible when interacting with the Interactable Objects in the game world.
Interactable Objects provide Interactable Actions by implementing the IWorldInteractableObject::GetInteractableActions() interface function.
Let’s examine the complete flow, shall we?
In Poltergeist, within our base Character, we have a function that activates when the player holds the ‘E’ key.
This function checks the currently targeted Interactable Object, gets the available World Actions associated with it, and determines whether the character can execute any of these actions.
void APG_CharacterBase::Input_WorldInteract_Hold(const FInputActionValue& InputActionValue)
{
	if (PC->bShowMouseCursor) return;

	TMap<FGameplayTag, bool> ActionChecks;

	//Get all usable Interactable actions, checks if we are  looking at interactable object.
	if (WorldInteractionComponent->TryCheckInteractableActions(ActionChecks))
	{
		FPieData ActionsPie;
		ActionsPie.PieType = FPGTags::Get().Pie_Type_World_Action;
		ActionsPie.PieHandledType = EPieHandledType::OneShot;

		TStringBuilder<256> ActionString;
		AActor* InteractTarget = WorldInteractionComponent->ClosestToScreenCenter_InteractableActor.Get();
		ActionString.Appendf(TEXT("Available Actions for %s \n"), *WorldInteractionComponent->ClosestToScreenCenter_InteractableActor.Get()->GetName());
		if (ActionChecks.Num() == 1)
		{
			//This function will use the PrimaryAction.
			if (WorldInteractionComponent->TryUseInteractable())
			{
				return;
			}
			//If the ActionChecks first action is not the IWorldInteractableObject::Execute_GetPrimaryInteractableAction, then we use the first action in the ActionChecks map.
			else
			{
				TArray<FGameplayTag> ActionsArray;
				ActionChecks.GetKeys(ActionsArray);
				if(WorldInteractionComponent->TryUseInteractableWithAction(ActionsArray[0]))
				{
					return;
				}
			}
		}
		for (auto Pair : ActionChecks)
		{
			ActionString.Appendf(TEXT("%s : %s \n"), *Pair.Key.ToString(), Pair.Value ? TEXT("True") : TEXT("False"));
			ActionsPie.PieData.AddTag(Pair.Key);
			if (!Pair.Value)
				ActionsPie.DisabledPiesSlices.AddTag(Pair.Key);
		}

		if (ActionsPie.PieData.HasTag(FPGTags::Get().InGame_World_Action_UseItem))
		{
			// If we object can be interacted with an gadget, lets see if our character has the required gadget.
			FGameplayTagContainer UsableGadgets;
			// first, get the usable gadgets
			if (UPG_BlueprintFunctionLibrary::GetUsableGadgetsToUseForObject(InteractTarget, this, UsableGadgets))
			{
				//if character has only one usable gadget
				if (UsableGadgets.Num() == 1)
				{
					ActionsPie.PieActionTargetTag.Add(FPGTags::Get().InGame_World_Action_UseItem);
					ActionsPie.PieActionTargetTag[FPGTags::Get().InGame_World_Action_UseItem] = UsableGadgets.First();
				}
				else
				{
					// TODO Add new type of Pie, UseItems on Object.
				}
			}
		}

		UDecouple_Subsystem* Decouple_Subsystem = GetWorld()->GetSubsystem<UDecouple_Subsystem>();
		UM_InGameUI_GEN* InGameModel = Cast<UM_InGameUI_GEN>(Decouple_Subsystem->GetModelByClass(UM_InGameUI_GEN::StaticClass()));

		// Update IngameModel WorldActionPie.
		InGameModel->SetWorld_ActionPieData(ActionsPie);
		DebugLog(uint64(uintptr_t(this)), LogWorldInteraction, "%s", *ActionString)
	}
}
We inspect all the usable and non-usable actions, populating the InGameModel’s ActionPieData with the updated data for the World Action Pie.
Let’s take a closer look at what the SetWorld_ActionPieData(ActionsPie) function accomplishes from the header of UM_InGameUI_GEN.
FORCEINLINE void SetWorld_ActionPieData(FPieData InWorld_ActionPieData)
{
	World_ActionPieData = InWorld_ActionPieData;
	PropertyChanged(FPoltergeistDataTags::Get().Data_InGameUI_World_ActionPieData);
}
The most intriguing aspect here is the PropertyChanged() call, which those familiar with MVVM architecture will recognize as a Data Binding. .
In MVVM architecture, PropertyChanged() is like a messenger that tells the user interface (View) when something in the data (Model) changes.
It keeps the View in sync with the data, ensuring that what you see on the screen always matches what’s happening with the core data of your application. It’s like magic that makes Poltergeist UI responsive and dynamic.
So whenever the World_ActionPieData property in our InGame Model changes, our InGame View will be aware of it and trigger the event bound by the property binding.
That concludes our exploration of the World Action Pie.
Now, let’s take a quick glance at the Inventory Pies.
Inventory Pies (Action & Gadget)
Inventory Action Pie and Inventory Gadget Pie data is mostly static.
Both get initialized in the M_IngameUI::InitializeModel
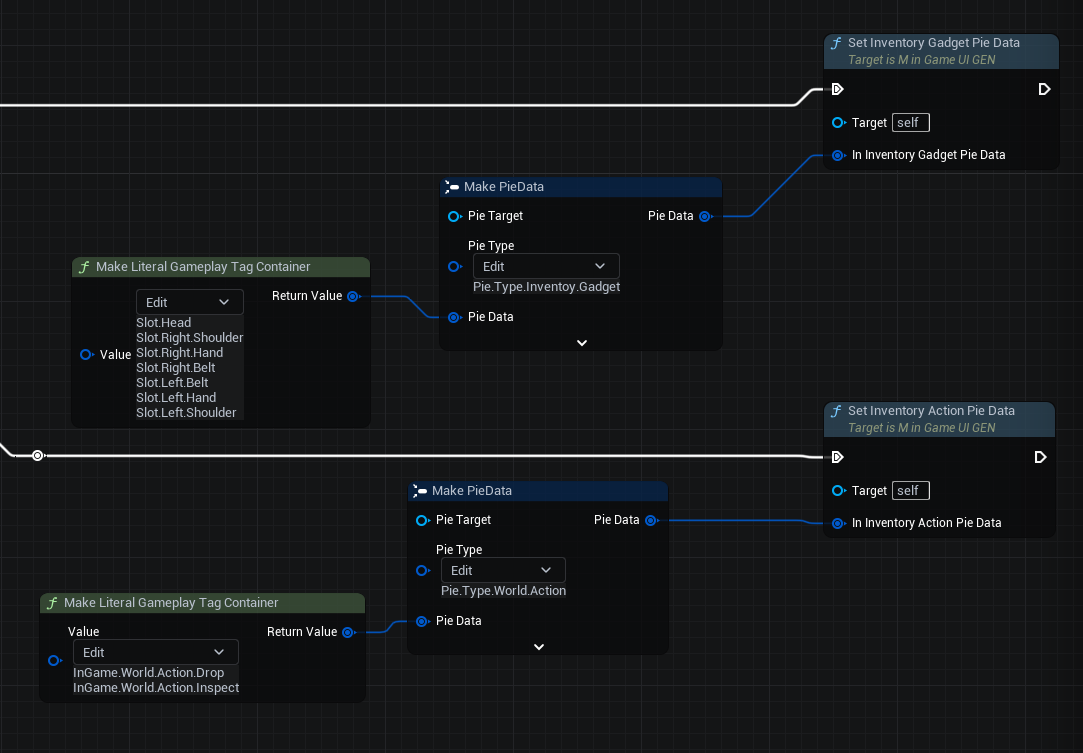
The only data that undergoes changes resides within the Inventory Gadget Pie, specifically related to whether a slot has an equipped gadget or not.
Now, let’s take a look at some in-game Piemenus.
Piemenus.
4. Popups
We’ve developed a straightforward and adaptable main menu, once again harnessed by the versatility of Decouple.
Lets have a look:
Main menu.
It’s nothing overly intricate; just a straightforward main menu. The most intriguing element is the popup at the end. Let’s dive into that.
This is how we display the popup.

DoPopup is asynchronous blueprint node is designed to return the user’s response along with optional Popup Data, which is essentially another variation of FDecoupleData
Here’s the source code for the Popup Task node.
-
UCLASS() class DECOUPLE_API UPopupTask : public UBlueprintAsyncActionBase { GENERATED_BODY() public: UPROPERTY(BlueprintAssignable) FOnPopupComplete OnPopupComplete; UFUNCTION(BlueprintCallable, meta = (BlueprintInternalUseOnly = "true", WorldContext = "WorldContextObject"), Category = "Decouple|Popup") static UPopupTask* DoPopup(const UObject* WorldContextObject,TSubclassOf<UUDecouple_ViewPopup> PopupClass, FGameplayTagContainer Answers, FText PopupTitle); // UBlueprintAsyncActionBase interface virtual void Activate() override; //~UBlueprintAsyncActionBase interface private: UPROPERTY() const UObject* WorldContextObject; FGameplayTagContainer Answers; FText PopupTitle; TSubclassOf<UUDecouple_ViewBase> PopupClass; }; -
UPopupTask* UPopupTask::DoPopup(const UObject* WorldContextObject, TSubclassOf<UUDecouple_ViewPopup> PopupClass, FGameplayTagContainer Answers, FText PopupTitle) { UPopupTask* BlueprintNode = NewObject<UPopupTask>(); BlueprintNode->WorldContextObject = WorldContextObject; BlueprintNode->Answers = Answers; BlueprintNode->PopupTitle = PopupTitle; BlueprintNode->PopupClass = PopupClass; return BlueprintNode; } void UPopupTask::Activate() { UDecouple_Subsystem* Decouple = WorldContextObject->GetWorld()->GetSubsystem<UDecouple_Subsystem>(); UDecouple_ViewModelPopup* PopupViewModel = Cast<UDecouple_ViewModelPopup>(Decouple->GetOrCreateViewModelByClass(UDecouple_ViewModelPopup::StaticClass())); UDecouple_ModelPopup* PopupModel = Cast<UDecouple_ModelPopup>(PopupViewModel->GetMyModel()); PopupViewModel->CreatePopup(PopupClass); PopupViewModel->SetPopupTitle(PopupTitle); PopupViewModel->AddAnswers(Answers); PopupViewModel->ShowPopup(); PopupModel->OnPopupComplete.BindLambda([this](const FGameplayTag& AnswerTag, const FDecoupleData& PopupData) { OnPopupComplete.Broadcast(AnswerTag, PopupData); SetReadyToDestroy(); }); }Activatewill attach a lambda function to the event when the popup has been processed, broadcasting both the resulting answer and any additional popup data back to the blueprint.
The Popup has its own ViewModel and Model.
When we execute the asynchronous node, we instruct the ViewModel to generate a new popup and populate the View Popup with the responses provided by the node.
// For every answer given, create a widget (usually a button).
void UDecouple_ViewModelPopup::AddAnswer(const FGameplayTag& AnswerTag)
{
	const UDecouple_ModelPopup* Model = Cast<UDecouple_ModelPopup>(GetMyModel());
	const TSubclassOf<UUDecouple_ViewBase> AnswerClass = Model->ViewPopupWidget->GetAnswerClass(AnswerTag);

	if (!IsValid(AnswerClass))
	{
		UE_LOG(LogDecouple, Error, TEXT("Not valid answer class on Popup %s, tag: %s"), *Model->ViewPopupWidget->GetFullName(),*AnswerTag.ToString())
		return;
	}
	UUserWidget* CreatedWidget = GetDecoupleSubSystem()->CreateWidgetOrGetUniqueWidget(AnswerClass,NULL, Model->ViewPopupWidget.Get());

	//If button, do binding and set text
	if(UUDecouple_ViewButton* AnswerViewButton = Cast<UUDecouple_ViewButton>(CreatedWidget))
	{
		IDecouple_ButtonView::Execute_SetTextAndBinding(AnswerViewButton, GetTextForAnswer(AnswerTag), AnswerTag);
		AnswerViewButton->OnButtonPressedWithBinding.AddDynamic(this, &UDecouple_ViewModelPopup::UDecouple_ViewModelPopup::HandlePopup);
		AddAnswerButtonToModel(AnswerViewButton);
	}
}
When the user confirms the popup, ViewModel will ask the Popup View if there is a need to populate the Popup Data.
void UDecouple_ViewModelPopup::HandlePopup(const FGameplayTag& HandleTag)
{
	UDecouple_ModelPopup* Model = Cast<UDecouple_ModelPopup>(GetMyModel());
	Model->PopupData = FDecoupleData();
	Model->ViewPopupWidget.Get()->GetDataByAnswer(HandleTag, Model->PopupData);

	if (Model->OnPopupComplete.IsBound())
		Model->OnPopupComplete.Execute(HandleTag, Model->PopupData);

	ClearPopup();
}
UUDecouple_ViewPopup::GetDataByAnswer() is a BlueprintNativeEvent intended to be implemented by the Popup View if additional data is required to be returned by the popup.
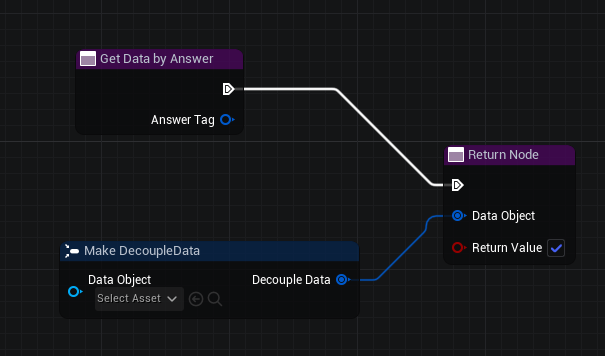
Finally, when the data is ready, the OnPopupComplete delegate will be triggered, and our Do Popup Task Node will broadcast both the resulting answer and any additional popup data back to the blueprint.
Concluding this introduction to Decouple and its role within Poltergeist's systems, we’ve just begun to scratch the surface of its capabilities.
As we continue to explore its potential within Poltergeist, we’re eager to see how Decouple enhances the game and contributes to its overall experience.
If you’re interested in trying out Decouple for yourself, we welcome you to join our Discord community. Here, you can connect with fellow developers, share insights, and explore how Decouple contributes to the development of Poltergeist while considering its potential for your own projects.
In the realm of game development, practical tools like Decouple are invaluable, and we’re excited to witness its impact on Poltergeist as it evolves, while also considering its potential to enhance your own game development projects.
Stay tuned for more insights and details on these aspects of Poltergeist in the next posts.
Here’s a sneak peek of the topics we’ll be covering in our upcoming posts:
- Gadgets
- Pockets
- Interactable Objects
- Gadget Batteries
- General Replication
- Immersive Lookat
- Highlights